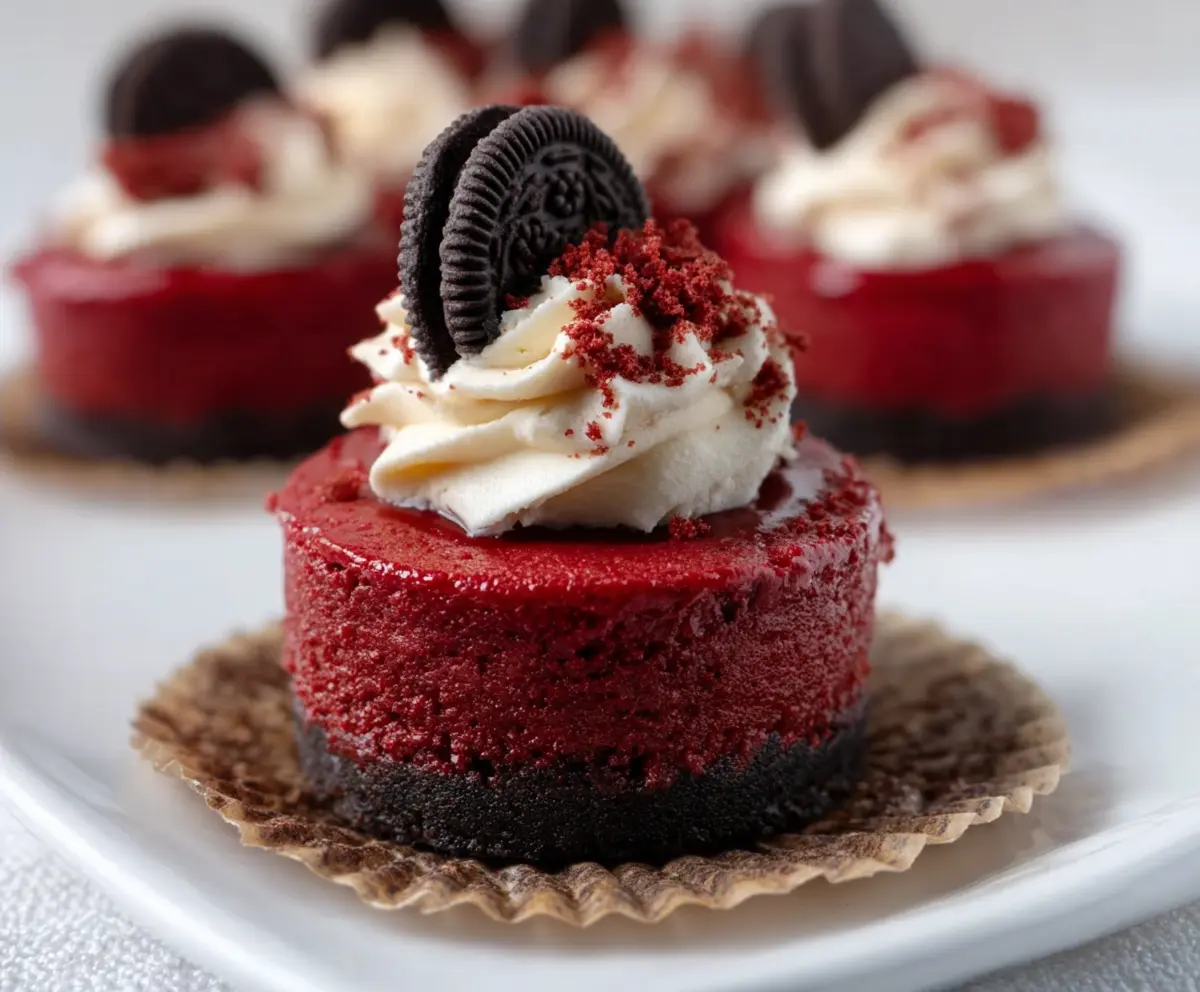
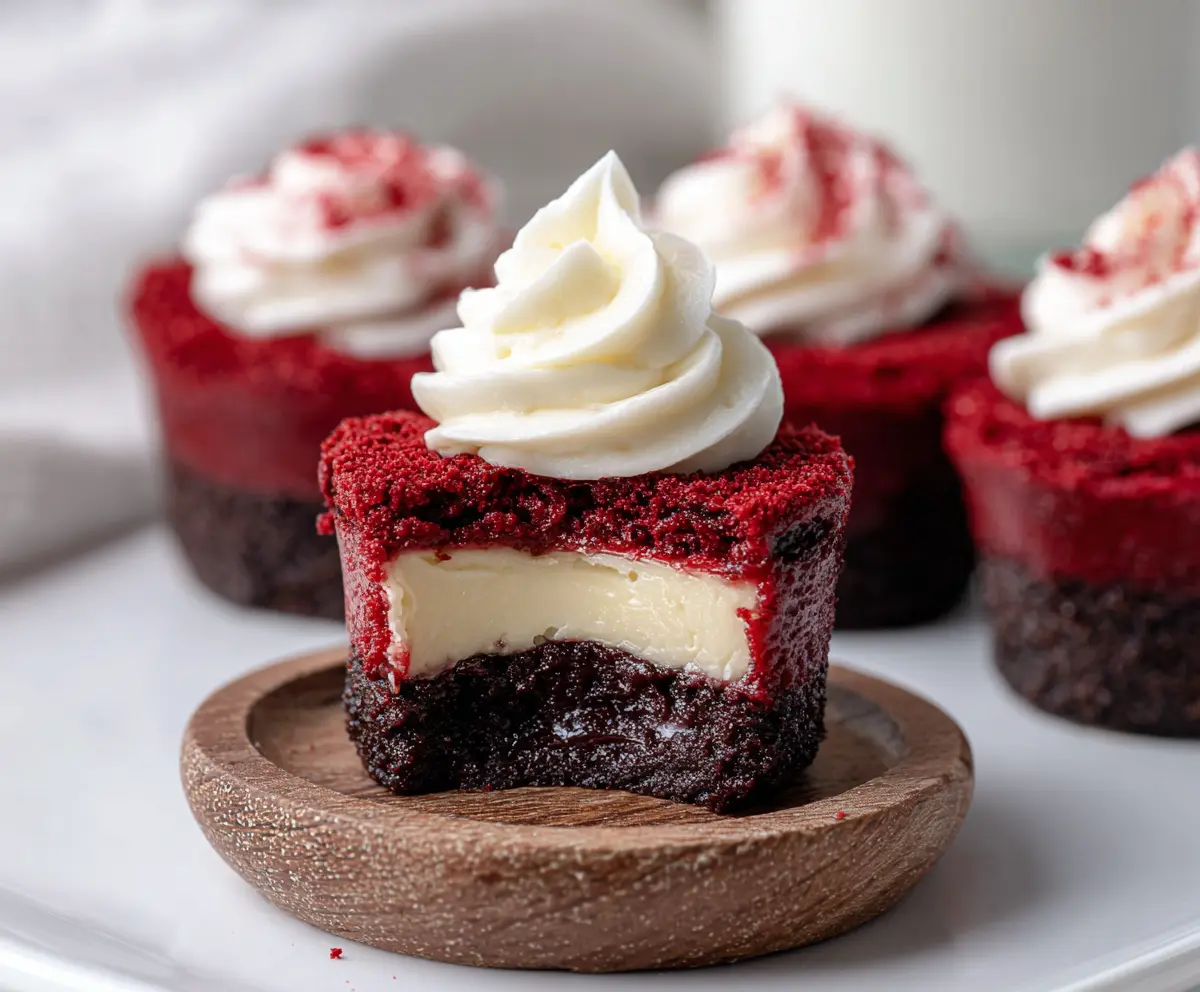
Mini Red Velvet Cheesecakes are little treats that bring together the smooth, creamy texture of cheesecake with the rich, chocolatey flavor of red velvet cake. These bite-sized desserts are topped with a swirl of tangy cream cheese frosting, making each one feel like a special celebration on your plate. They’re perfect for anyone who loves a sweet, velvety dessert that’s just the right amount of fancy and fun.
I love making these little cheesecakes because they’re so easy to share at parties or just as a sweet surprise for the family. Plus, I find that their small size makes it easy to enjoy a couple without feeling guilty. A little tip: I like to chill them well before serving—that way, the cheesecake is firm and the frosting holds up beautifully, making each bite silky and smooth.
These mini cheesecakes always bring back fun memories for me, especially around the holidays when red velvet desserts seem to pop up everywhere. I like serving them with a hot cup of coffee or a glass of milk. It’s such a cozy combo that instantly lifts the mood and gets everyone smiling. You really can’t go wrong with these sweet little gems!
Key Ingredients & Substitutions
Oreos (Crust): These cookies create a chocolatey, crunchy base. You can swap Oreos for any chocolate wafer cookies or graham crackers if you prefer a lighter crust.
Cream Cheese: This is the heart of the cheesecake, giving it that creamy, smooth texture. Use full-fat cream cheese for the best flavor, but light cream cheese can work if you want fewer calories.
Red Food Coloring: It gives the cheesecake that classic red velvet look. If you want to avoid artificial dyes, try natural beet juice powder as a substitute.
Buttermilk: Adds a slight tang and moisture. If you don’t have buttermilk, mix regular milk with a teaspoon of vinegar or lemon juice and let it sit for a few minutes before using.
Heavy Whipping Cream: Used for the whipped topping, it adds richness and lightness. If you want a dairy-free option, try coconut cream whipped with powdered sugar.
How Do You Get Smooth, Crack-Free Cheesecake Filling?
Smooth cheesecake needs the right mixing and baking methods to avoid cracks or lumps.
- Beat cream cheese until very smooth and lump-free before adding other ingredients.
- Add eggs one at a time, mixing well after each, but avoid overbeating once eggs are added to prevent too much air.
- Fold in wet ingredients gently; don’t stir aggressively.
- Bake cheesecakes in a low, steady oven temperature (around 325°F/163°C).
- Stop baking when edges are set but center is still a little jiggly. The residual heat will finish cooking it.
- Cool cheesecakes at room temperature before chilling in the fridge to prevent cracking from sudden temperature changes.
Equipment You’ll Need
- 12-cup muffin tin – I use this to hold the cheesecakes securely in place while baking.
- Paper cupcake liners – make removing the mini cheesecakes easy and keep them looking neat.
- Stand mixer or hand mixer – helps you beat the cream cheese and whip the cream quickly and smoothly.
- Mixing bowls – for preparing the crust, batter, and whipped topping.
- Spatula – great for folding ingredients gently without deflating the batter.
- Measuring cups and spoons – to get all ingredients just right for perfect results.
Flavor Variations & Add-Ins
- Swap Oreo cookies for chocolate graham crackers in the crust for a richer, more classic flavor.
- Mix in mini chocolate chips or white chocolate chunks into the batter for extra sweetness.
- Add a splash of vanilla extract or almond extract in the filling to change up the flavor profile.
- Top with fresh berries or a drizzle of chocolate sauce for a colorful finishing touch.
Mini Red Velvet Cheesecake
Ingredients You’ll Need:
For the Crust:
- 20 Oreo cookies (or similar chocolate sandwich cookies), finely crushed
- 4 tablespoons unsalted butter, melted
For the Red Velvet Cheesecake:
- 16 oz (450g) cream cheese, softened
- ¾ cup granulated sugar
- 2 large eggs
- 1 teaspoon vanilla extract
- 1 tablespoon cocoa powder
- 1 tablespoon red food coloring
- ¼ teaspoon salt
- ½ cup buttermilk
- 1 teaspoon white vinegar
- ½ teaspoon baking soda
For the Topping:
- 1 cup heavy whipping cream
- 2 tablespoons powdered sugar
- 1 teaspoon vanilla extract
- Extra red velvet cake crumbs (reserved from a small portion of the batter baked separately or saved from trimming)
- Mini Oreo halves for garnish
How Much Time Will You Need?
This recipe takes about 20 minutes of preparation and 25 minutes for baking. Then you’ll chill the cheesecakes for at least 4 hours or overnight before adding the topping and serving. Total time is roughly 5 hours or more if you include chilling.
Step-by-Step Instructions:
1. Prepare the Crust:
Preheat your oven to 325°F (163°C) and line a 12-cup muffin tin with cupcake liners. Combine the finely crushed Oreo cookies with the melted butter. Press about 1 tablespoon of this mixture into the bottom of each paper liner, creating an even crust layer. Bake the crusts for 5 minutes, then take them out of the oven to cool while you make the cheesecake batter.
2. Make the Red Velvet Cheesecake Batter:
In a large bowl, beat the softened cream cheese and sugar together until the mixture is smooth and creamy. Add the eggs one at a time, beating well after each. Mix in the vanilla extract, cocoa powder, red food coloring, and salt. In a separate small bowl, combine the buttermilk, vinegar, and baking soda—they will fizz up. Gently fold this wet mixture into the cream cheese batter until just combined, being careful not to overmix.
3. Bake the Mini Cheesecakes:
Divide the red velvet batter evenly over the prepared crusts in the muffin tin. Bake for 20-25 minutes, or until the edges are set but the centers still have a slight wobble. Remove from oven and allow the cheesecakes to cool to room temperature. Then cover and refrigerate for at least 4 hours or overnight to set completely.
4. Whip the Topping & Garnish:
Before serving, whip the heavy cream with powdered sugar and vanilla extract until stiff peaks form. Pipe or dollop this fluffy topping onto each chilled cheesecake. Sprinkle some extra red velvet crumbs over the top and add a mini Oreo half as a cute garnish. Keep them refrigerated until you’re ready to enjoy these delicious mini treats!
Can I Use Regular Milk Instead of Buttermilk?
Yes! To substitute buttermilk, add 1 tablespoon of white vinegar or lemon juice to ½ cup of regular milk and let it sit for about 5 minutes before using. This creates a similar tangy effect essential for red velvet flavor.
Can I Make Mini Red Velvet Cheesecakes Ahead of Time?
Absolutely! Prepare and bake the cheesecakes a day in advance, then refrigerate them covered. Add the whipped cream topping and garnishes just before serving for the freshest look and taste.
How Should I Store Leftover Mini Cheesecakes?
Keep leftovers in an airtight container in the refrigerator for up to 3 days. Avoid topping with whipped cream until ready to serve, as it can lose texture when stored.
Can I Skip the Red Food Coloring?
Yes, you can omit red food coloring if you prefer, but the classic red velvet color won’t be as vibrant. You’ll still get the rich chocolate and tangy flavor, so it’s a nice option if you want to avoid artificial dyes.